Wednesday, 17 April 2013

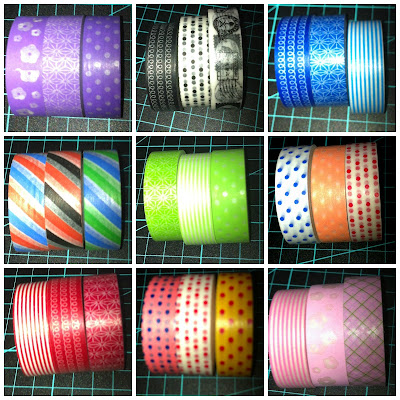
What is Washi Tape?

Welcome to our What is Wednesday!

We endeavour to post a new what is every week. But we need your help! Let us know what you would like to know more about ....

This week we are going to give you a brief history of Washi Tape and its many uses.

Basically Washi Tape originally comes from Japan and is made from rice paper. It is now manufactured in any different colours and patterns. 

Here is the description from wikipedia:


Washi (和紙?) is a style of paper that was first made in Japan. Washi is commonly made using fibers from the bark of the gampi tree, the mitsumata shrub (Edgeworthia chrysantha), or thepaper mulberry, but also can be made using bamboohemprice, and wheatWashi comes from wa meaning Japanese and shi meaning paper, and the term is used to describe paper made by hand in the traditional manner.[1]
Washi is generally tougher than ordinary paper made from wood pulp, and is used in many traditional arts. OrigamiShodo, and Ukiyo-e were all produced using washi. Washi was also used to make various everyday goods like clothes, household goods, and toys as well as vestments and ritual objects for Shinto priests and statues of Buddha. It was even used to makewreaths that were given to winners in the 1998 Winter Paralympics. Several kinds of washi, referred to collectively as Japanese tissue, are used in the conservation and mending of books. Washi has also found a new form, as a tape, usually combined with acrylic glue. It is similar to masking tape in that it is removable from most surfaces.

So, what do we use it for?
As well as using washi tape on layouts, creating borders and bits of interest on your page there is plenty more inspiration to be found on Pinterest! Here are some images from there: (original websites are watermarked on the photos :) )


We have a large variety of washi tape available in store and over 50 designs in our webstore. {here

Sunday, 14 April 2013

New Products in store this week.....

Have a look at all the great new dies that have just landed in store!


And these items have just been loaded to our online store:

You can find the Smash! items {here}


You can find Washi Tapes {here}

We have also started loading up our charms...


Check back every couple of days as our website is slowly filling up!

Wishing everyone a fantastic week!


Friday, 12 April 2013

Party Day now in store...

Beautiful bright papers for Scrapping those birthday memories.

Suits both boy and girl :)


Dyan Reaveley - Art Journal Cover

Good Morning everyone!

Please welcome Roz and her blog post :)


Textured Cover for Art Journal

Materials.....
  • Dyan Reaveley art journal 30x23cm
  • a magazine cut out of a pretty face
  • scrap booking papers
  • Glossy Mod Podge
  • Glossy Accents
  • Texture paste
  • Donna Downey chrysanthemum 6x6 stencil
  • ribbon and yarn- for tassels
  • diamante self adhesive jewels for her earrings,
  • buttons and lace,
  • the tissue tape to bind the edges,
  • the black Pilot Permaball pen to highlight the eyeliner and eyelashes
  • acrylic paints
  • a key and chain trinket
  • Matt Spray finishing sealer (available in store - not online)
  • Dyan Reaveley Dylusions ink sprays

Method-  I have torn up and pasted pieces of scrap booking papers onto the journal cover as a base. I used matt Mod podge as the adhesive both on the cover before sticking the paper and also some on the back of the paper. I found a picture of a pretty face in a magazine and pasted the face in the upper left corner. I fussy cut some flowers from the papers of some roses and pasted it in the top left corner to frame the face. I coloured some lace with Dylusions ink sprays to co-ordinate with the cover colours. I made a rosette for the lady’s hair, and glued with a black felt flower and diamante. I also glued diamante below her right ear for earrings. When the Mod Podge was dry I used the Pilot Permaball to highlight the eyes and eyelashes.


I used texture paste tinted pale orange with acrylic paint, and thickly spread it over the flower stencil with a spatula, lifting up to reveal a textured flower design about where the dress would be. I also used the texture paste coloured scarlet to carefully fill in the lips. When dry (12hrs later) I applied Glossy accents – so the lips have a 3D effect!  

I used letter cut outs and words for the title and year 2013. I used more coloured lace on the right edge border and a row of buttons glued with glossy accents across the bottom of the cover. I randomly stamped sayings and writing about the page for interest. I added a flower paperclip with a chain and key. I glued the paperclip only, leaving the key to dangle.
I edged the cover with washi tape (tissue tape) and with a brad attached a selection of textured wool strands and ribbon to the spine of the journal to use as page markers.

I used matt Mod Podge to coat the whole cover as a sealer. Leaving overnight to dry between coats (or use a dryer to speed the process). I used 3 coats of Mod Podge.

Handy Hint:-  There is usually a slight tackiness even when the Mod Podge is dry, to overcome this, spray finally with a coat of Matt Spray finishing sealer (use outdoors and avoid breathing the vapour) and leave outside to dry overnight. Happy art journaling!

By Rosalyn Kelly 


Thank you Roz :)

We have another post by Roz which will be posted early next week.

All items (except for magazine cut out) is available in store. :)


Friday, 5 April 2013

New Page Kit - Prima Divine

Hello!

Who has scrapbooking on the menu this weekend? Not feeling very inspired but would like to create? How about one of our page kits?

We have a variety of layout and card kits available in store. Have a look at our new one:


Kit includes 5 1/2 papers, plenty of flowers, butterflies and Lace.


These kits are in very limited supply :) Kit can be purchased {here}

Thursday, 4 April 2013

Kit of the Week - Cards!

Good Morning!

This weeks Kit of the Week is to make 3 stunning cards featuring the Homemade Collection.


The kit comes with full instructions, 18 (6x6") papers, embellishments and card.

This kit can be purchased {here}

Wednesday, 3 April 2013

Basic Grey Bi-Monthly Scrap Kits

Good Evening!

Do you subscribe to the Basic Grey scrap kits? do you make them exactly as they are?

They don't always suit me so I usually create something totally different. On Sunday afternoon I finally got a chance to sit down with the kit from March / April.

The kit came with plenty of papers, alphabet stickers, dimensional stickers + more.

Here is the layout created by the Basic Grey Design team. Full instructions are included for this.

First I created a single page layout:

There where plenty of left overs, and after being inspired by something I saw on Pinterest I created a folder to store cards and envelopes. I often give handmade cards as gifts, so being able to gift them in a folder seemed like a great idea! 

I didn't measure - just made it as I went. Luckily it did end up fitting the cards and envelopes :)


At Wednesdays class the ladies loved this idea so much that there will be a class on it soon on a Saturday afternoon and Wednesday morning.

The other kit featured the Bowties Collection.

I LOVED the green papers in the collection and thought it was such a great shame they weren't featured so I created the following 3 layouts. One of them still needs a title but I didn't have the cricut machine at home :)


I still have 2 of each kit left in the shop, let me know if you would like it :)

Wishing everyone a fabulous week!